
So while it's true that I spend most of my time running around as a giant, angry badger bear, I really enjoy changing pace whenever I can (especially in raids) and turning into the ultimate ankle-shredder. Achilles' tendons, beware.
The cat DPS rotation can be a little tricky to get the hang of. You have to watch a lot of buffs/debuffs and make decisions based on how much time (if any) is left on them.
Cats are like furry Rogues that run around on all fours. Our abilities depend on Energy and Combo Points. We use stealth to sneak up behind our enemies and tear them apart before they can even react to our presence. We rely on causing our target to bleed to death as much as, if not more than, outright dicing them into little pieces.
But whereas Rogues have 3 different talent trees through which they can hone their killing prowess, we get one. We can do a little bit of everything a Rogue can, but can't specialize in any one area like them. That said, we relate closer to Assassination Rogues than Combat or Subtlety. Lots of burst damage and combo points that multiply like jackrabbits. Sustained DPS is a little tougher for Cats. We can't depend on a steady stream of high white damage, but we do have a bleed (Rip) that can crit for 200% of it's normal damage on any given tick (via Primal Gore).
For any of that to mean anything, however, we have to have an effective attack rotation to keep our DPS as high as possible. Except attack rotation is a little bit of a misnomer. If it were a true rotation, we could just make a cast sequence macro, toss it on our action bar and mindlessly click our way to the top of the DPS charts. Fortunately, for the sake of keeping the game fun and interesting, it doesn't work that way. Instead we have to deal with an attack matrix, or attack decision tree.
What I describe below is the basic decision tree for Cats. It represents what we would do in a perfect world where the only thing we ever fought was Patchwerk. A fight where we just stand motionless behind our target and tear him to pieces without any other care in the world. But not every fight is Patchwerk, and we do have cares in the world. We have fights against multiple trash mobs. We have fights where we have to bounce back and forth between the boss and adds. We have fights where we have to try to keep up as the tank drags the boss around the room. We have to move so we don't drop a big poison cloud on our fellow dps. We get plinked into crotch pots. We have to move so that we don't cross the streams charges. We have to move out of the fire/void zones/poison clouds. We have to switch targets to frozen/impaled/webbed allies. We have to stay where we are because we're in a stupid flame ring even though Shade decided to run his emo ass to the opposite end of the room and nuke us from over there as he's begging us to end his misery! *cough*
But that's later. Right now we just need to focus on the basics. And when we have those down, we can worry about more...complicated situations.
Abilities:
The Cat attack decision tree focuses on 8 of our abilities:
Mangle
Rake
Shred
Rip
Ferocious Bite
Savage Roar
Tiger's Fury
Faerie Fire (Feral)
The Opener:
You may think that it's best to open a fight with one of our stealthed abilities, Pounce or Ravage. This is wrong. First, Pounce is a solo and PvP ability. You should never be using it in raid situations, especially if you're running with a rage tank. Why? Because a stunned enemy is not hitting your tank. If your Warrior or Bear tank isn't getting hit, he's not generating Rage. If he's not generating Rage (especially during the crucial opening moments of a fight) he can't use his abilities and suddenly mobs are running everywhere and wiping the raid. You don't want that on your head, do you? No.
As for Ravage, while it does a hell of a lot of damage, it costs 60 Energy. 60. That's a huge chunk of what we have. And you're only going to get one combo point out of it. Two if you crit, but that's still not worth it.
Instead it's best to start a fight in stealth and following a little bit behind your tank as he moves into position. As soon as he has a little bit of aggro on your primary kill target, toss a Faerie Fire on it. This will pop you out of stealth, but it doesn't matter as your tank should have initial aggro by this point and you won't be using your stealthed abilities. As you continue moving into position behind your target your tank should be generating enough threat that your initial volley of attacks won't vault you ahead of him. Once you're in position you should fire off a Rake, a Mangle, and a Shred, in that order. Those three attacks cost 111 energy (if you're specced properly). With the global cooldowns and the Energy regen rate (10 energy per second) you should have no trouble getting those off in quick succession.
Now you have a minimum of 3 combo points. More than likely, one of those attacks crit and you have 4. Maybe even 5. And you've been in combat for 3 seconds. Awesome. Now you're ready to drop into the decision tree.
The Attack Decision Tree:
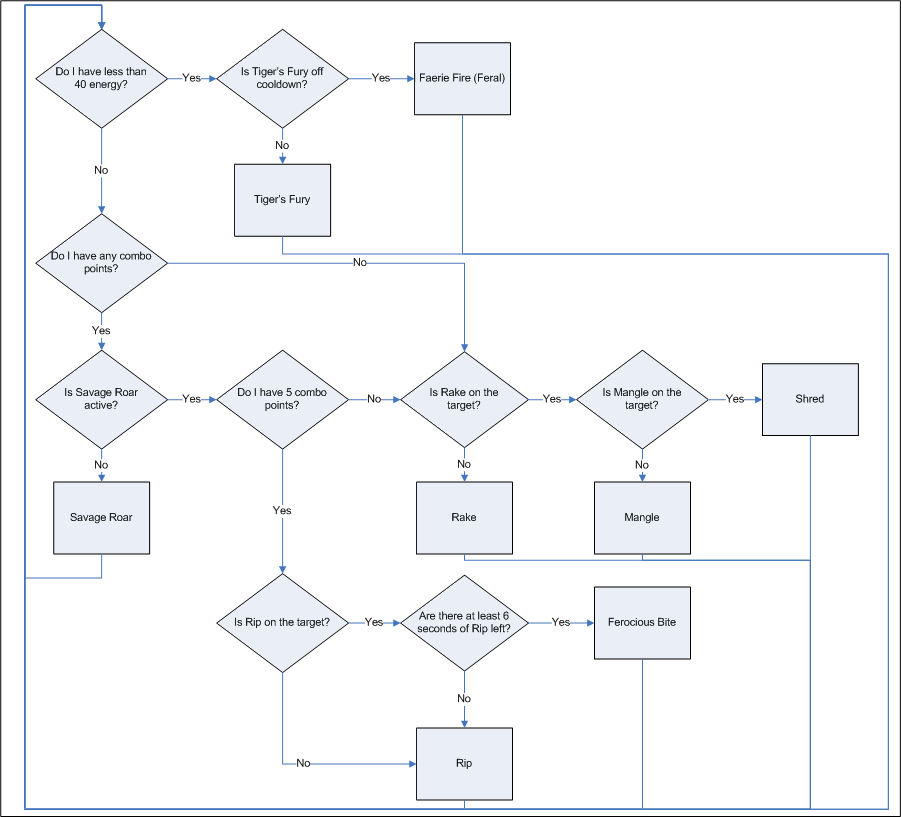
Different people absorb information in different ways. I'm going to present this decision tree in three different forms and hope that everyone will be able to make good sense of at least one of them.
Annotated version (start over at the top of the list every time you perform something):
1. If Energy < 40 and Tiger's Fury on cooldown, perform Faerie Fire (Feral)
2. If Energy < 40, perform Tiger's Fury
3. If Savage Roar is down and CP > 0, perform Savage Roar
4. If CP = 5 and Rip time > ~7 seconds, perform Ferocious Bite
5. If CP = 5, perform Rip
6. If Rake is down, perform Rake
7. If Mangle is down, perform Mangle
8. Shred
Flowchart version:
Click for Flowchart
Wordy, descriptive version:
The first question you have to ask is whether or not you have less than 40 energy. If not, use Tiger's Fury for a 60 Energy boost (this assumes you've specced 3/3 into King of the Jungle) to get you going again. If Tiger's Fury is on cooldown, you're stuck waiting for energy to build up, so it's a good time to refresh Faerie Fire on the target.
If you have more than 40 Energy, the next thing you need to check is whether or not your Savage Roar buff is active. If it's not, you need to use any combo points you currently have to activate it. If you don't have any combo points, you need to get some and then activate Savage Roar as quickly as possible.
To build combo points you'll be using Rake, Mangle, and Shred. Which one of those you use is based on the debuffs currently on your target. If Rake is not on the target, use Rake. If Rake is on the target and Mangle is not, use Mangle. If both Rake and Mangle are on the target, then Shred.
Finally, when you have 5 combo points available and you have your Savage Roar buff active, you can use one of your combo finishers. The vast majority of the time, this is going to be Rip. But if you're not moving around a lot and you're getting a lot of crits, it's very possible that you'll still have a fair amount of Rip time left since your last one. Check your target's Rip debuff. If there's at least 6 seconds left on it then perform Ferocious Bite instead.
Rinse, repeat.
Assuming you got no Omen of Clarity procs (either because you didn't spec into it or the RNG just wasn't on your side), your first 7 actions will almost always be Faerie Fire, Rake, Mangle, Shred, Tiger's Fury, Savage Roar, Shred.
Variations:
Omen of Clarity:
If you have specced into Omen of Clarity, then the decisions become a little trickier. You basically have two options:
1. Don't worry about watching for the OoC procs. Let them come as they come and just enjoy the fact that the next attack in your decision tree isn't going to cost you any energy.
2. Pay close attention to the OoC procs. Any time you get one, immediately Shred, as it's your highest energy attack (which you'll now get for free) and has extremely high burst damage. Then fall back into the decision tree as normal.
I tend to choose these based on the fight. For fights like Heigan, Mimiron, or Faction Champs where I'm paying attention to a lot of things other than just DPSing the boss, I'll usually go with option #1. For most other fights I'll do my best to stick with option #2.
When at all possible, I really like to use my OoC procs on Ferocious Bite. Most of the time FB leaves you completely Energy drained and straining to keep up until your Tiger's Fury comes off cooldown. Using an OoC proc on it really helps keep your DPS up afterwards.
No Shred:
There are people who like to take Shred out of the mix completely and just end the decision tree with Mangle. The logic used is that Mangle costs 8 Energy less than Shred (almost a second less of Energy regen time), doesn't require you to be behind the target, and doesn't do whole hell of a lot less damage.
There are valid points to this. It's definitely easier to manage as you can be sure the Mangle debuff is constantly on the target without having to check for it. In fights with a lot of movement, you don't have to worry about losing time to position yourself behind the mob.
It can also free up 2 talent points that you would have otherwise spent in Shredding Attacks. (Up until 3.1, there was also a case for it saving points used for Rend and Tear, but with those points being required for Primal Gore, that's no longer applicable.)
I've seen Cats doing comparable damage either way. So this choice basically comes down to your comfort level. If you can juggle the extra complexity, you'll crank out more DPS by using Shred. But if it's proving tough to keep a good rotation with it in there, you'll actually hurt your DPS overall and may consider going to a Mangle-only method.
Cower:
At some point in time, there's a possibility that you're going to have to start paying attention to a 9th ability: Cower. If you massively outgear your tank or your tank is switching targets between a large group of mobs while you're primarily focusing on one, Threat can start to become an issue. Rogues can just dump their threat out on the target of their choice: "He stabbed you repeatedly in the back, not me. I swear! I'm just back here knitting a sweater." We don't get that luxury. We just have to spend some of our time and Energy pretending we're afraid of our target: "Please don't hurt me! I'm just a delicate, pretty little kitty. I'm the least of your concern here. Umm...purr?"
You do not want to wait until you're about to pull threat from the tank to use Cower. Why? It really only drops about 1K threat, which in today's raiding world is almost nothing. With all your bleeds ticking away on the mob, it's not going to last long. Especially if do something crazy like crit Shred and Ferocious Bite back-to-back. No amount of cowering is going to convince the big bad guy you're not a threat then. You'll want to use Cower early and use it regularly to make sure you're staying well below the tank in threat once you find that you're good enough to keep up with/pass him.
Trash:
There's two general types of trash you're going to come up against. Packs and high-health single mobs. You can typically treat the larger single enemies like bosses. You'll have enough time to get through a couple of your rotations before they die. Most trash packs, however, aren't going to last long enough for you to really get going or for your bleeds to truly be effective. Often on trash packs it's best to make keeping Savage Roar up your first priority, and then either use your burst damage abilities (Mangle, Shred, Ferocious Bite) to bring them down or start throwing out some Swipes for AoE damage. Getting SR up before Swiping will help ensure that your tanks have enough of a threat lead that you won't suddenly pull 3 mobs and get insta-killed.
Berserk:
Berserk is where things really get fun for Cats. This is our once-every-three-minutes omgdps ability. Pop this and you have 15 seconds of seemingly endless Energy. In ideal situations, you'll want to wait until you're pretty much out of energy, hit Tiger's Fury (to get you back near full and give you the damage boost to boot), then hit Berserk. Since TF is off the global cooldown, you can even macro this for maximum effect:
/cast Tiger's Fury
/cast Berserk
In most cases I can get through 3 full rotations with this, using FB for the finisher on the last since my SR and Rip abilities will still have at least 10 seconds left on them, if not more. Just remember to watch your threat as you do this, because it's going to go through the roof.


Feral By Night recommends "Mangle + SR" as the opener. "Mangle + Faerie Fire + SR" is probably also acceptable.
ReplyDeleteYou want the Mangle to open so you get the bonus on bleeds before you Rake. And you basically never want to make ANY attack without Savage Roar up.
I'll have to try the Mangle vs. Shred on a target dummy and see how it goes. That would be VERY interesting for a hybrid bear/cat spec.
Don't know if you'll see this but I wanted to say thank you. My druid's cat dps went from riding as low as the tank to being far and away top of the dps meter in leveling instances. I'm really enjoying my kitteh now
ReplyDelete-Cheres
@Keith
ReplyDeleteA very valid point, and FBN definitely knows their stuff. At the very least I should switch the order of those first two attacks (and I probably will from here on out).
Ultimately, though, in a 5-minute fight, what you do in the first 5 seconds isn't going to make a drastic difference and I personally prefer to start SR with a 4- or 5-CP duration. It helps me manage the overall rotation better when it stays consistent throughout.
@Cheres
You're very welcome.