
Before I get into all the nitty gritty, here's the screenshot (click for full a bigger size):
This UI is very heavily modeled after the one CiderHelm (of TankSpot fame) was using back at the beginning of Wrath when he was posting his boss strat guides for Naxxramas. At the time I was still pretty much using the default UI (because customizing a new one seemed like a very daunting task that I was loathe to take on) and his really appealed to me as clean and functional. I've tweaked it a bit here and there, but it still remains the basis for what I've done here.
The Basics:
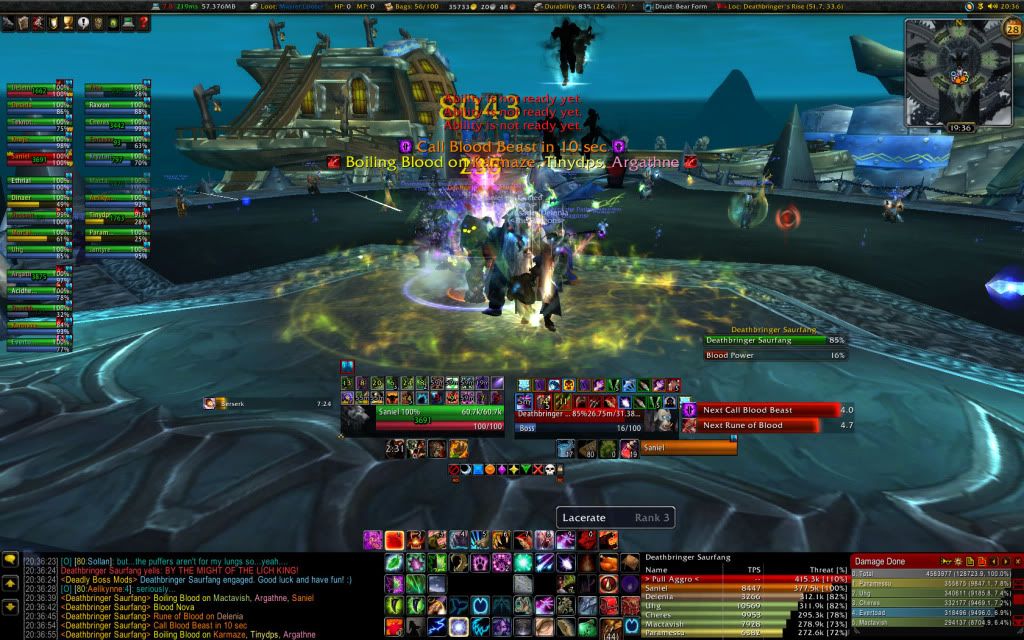
CBHViewport - This creates the empty space on my screen at the bottom and top that most of my UI elements rest in. For the most part I hate having UI elements over my display. In some cases (like my raidframes off to the side) it's tolerable and in others (my unit frame and my target's unit frame) I recognize the necessity of it enough that I push those little voices aside. But my main goal with most any UI is to interfere with the rendering space as little as possible.
TitanPanel - The bar across the top of the screen where I keep track of both some system info (like my fps, latency, and system time) and in-game stuff (location, bag space, durability, etc.) It's also my main access point to Outfitter (the "Druid: Bear Form" bit is referring to my currently equipped gear set, not my actual form).
SexyMap - While a lot of people use SexyMap to make their map flashier, I prefer to keep it simple. Square it off and hide most of the addon buttons that hover around it until I move my mouse there. I also display the realm time on the map.
Prat - Just used to tidy up the chat pane a little bit and make it easier to read.
OmniCC - OmniCC sticks duration timers on auras and cooldown timers on abilities. If there's one addon I absolutely use on every single character I create, it's this one.
Unitframes:
ShadowedUF - I originally used ag_UnitFrames for this purpose. After the death of ag_UnitFrames, I moved to ShadowedUF mostly because it looked almost the same. It had a lot of the same configuration options and it seemed much easier to me to duplicate the look and feel I already had rather than fiddle with a completely unique UF addon until I came up with a new format I liked.
I keep my and my target's unitframes right below where I'm tanking. This lets me keep an eye on the ground under my feet and my health without moving my eyes. It's also close enough to my two most important action bars that I don't have to shift my focus much to see them. Target of target is also active here.
The rest of the raid is shoved off to the left side. The important things here are the debuffs (so I can see if someone's standing in bad stuff) and aggro. In this shot you can see my bar is red, meaning I have aggro. If I had thought about this and taken the screenshot while blood beasts were up, you'd see several more of those bars red. I've gotten pretty good at giving a quick glance up there every few seconds to make sure aggro is staying on the people it's supposed to be on.
Action Bars:
Bartender4 - On San I kind of break from "clean UI" tradition and keep pretty much every spell or action I have on my screen. I use each of them just frequently enough (by which I mean "more than never") that I can't justify relegating them to my spellbook until special situations occur.
The bar right above the area cleared by CBHViewport is the most dynamic...and there's actually 3 bars in that space. When I'm in Cat or Bear form, they show the abilities specific to those forms. Each of these have the main set of 10 abilities plus one extra bar to hold what wouldn't fit in that space.

The Cat form bar
If I'm in a vehicle or otherwise have a set of abilities that are not my own, they also get shown there. If none of those three things apply, the space is empty.
The bar right below the health frames is my "oh shit" bar. It's where I put my cooldowns and other emergency actions. It's also where I stick situational macros when I need them. This one changes depending on my spec, but ends up looking almost exactly the same either way.
Coconuts - You see that little icon at the bottom right of my action bar box? The one that currently displays the travel form icon? That's Coconuts. Coconuts is a random mount selector. Since I'm currently in combat, the only "mount" choice I have is travel form, so that's what it's displaying. However, when not in combat, it will show the icon of whatever mount is next up to be mounted.
...
Yeah. Anyway, it's pretty cool. It knows when I can and can't hop on a flying mount and will choose accordingly. It also lets me set frequency modifiers in case I like certain mounts more (Drakes, Sabers) or less (Mechanostriders, Nether Rays).
Party/Raid stuffs:
Deadly Boss Mods - There's a couple things going on here. First is the big popup warnings. I keep these in the default position in the upper middle of my screen. It works well for me.
Timers for events that are a ways out are showed next to my unit frame. Impending timers move over near my target's unit frame.
I'm not sure why I have the boss health frame up in this fight. I typically only display that in instances where there's several bosses (I3, Faction Champs, Blood Princes) or fights where I spend a lot of time not targeting the boss (Ignis, Rotface, Putricide).
Recount - Pretty basic. I use it mostly to keep track of the raid as a whole, especially on tight DPS fights like Festergut. It also helps me keep track of what's killing people if we're having problems with stuff, which is invaluable as a raid lead.
Omen - So I know when the Hunters or Warlocks are about to pull threat...if I'm paying attention.
LuckyCharms2 - That little bar of raid markers under the "oh shit" bar is LuckyCharms. It's a quick and easy way to throw marks on raid targets. I prefer this over the key-bind method. LuckyCharms also comes with a Ready Check button and a "Announce Kill Order" button (which is configurable).
Not Pictured:
PowerAuras - It just so happens that none of the Auras I have set up are being displayed at the time I took this screen shot. I don't use many. In San's case, I use one to show when my target is not Fearie Fired, when I am Beaconed, and one other very situational thing that I can't even remember right now.
This is another addon that I use on just about every toon I have, though usually for small things. On my Priest I track when Vampiric Embrace or Inner Fire have expired. On my Hunter I track when I'm above 90% mana, below 10% mana, and when I have Aspect of the Viper active.
So that's pretty much it. There's still a few things I'm not crazy about with this setup:
- The location of the menu action bar. The one that opens the character screen or spell book or quest log, etc. I originally had this hidden, as I access most of those through the keybinds. But I found that I very frequently wanted to open them while I was in the middle of typing something, which meant that I had to copy what I'd typed, escape out of the chat box, open the menu, re-paste what I'd typed, and do whatever I meant to do. Huge hassle. The bar's not really in the way where it is...it just bugs me in principle.
- When an achievement pops up, it covers the top half of my main action bar. If I'm furiously clicking away at abilities (particularly during boss fights) then I end up clicking the achievement and opening the entire Achievement pane...which can be a huge pain in the butt.
- I wish I could get rid of the tooltips. I know all my abilities...the names, what they do, everything. I don't need to see it. At least not on San. (I wish the option in the Interface menu that turned detailed tooltips on and off worked on a per-character basis.)
In contrast, here's what I use on Daluaan, the only other toon I have with a completely revamped UI:
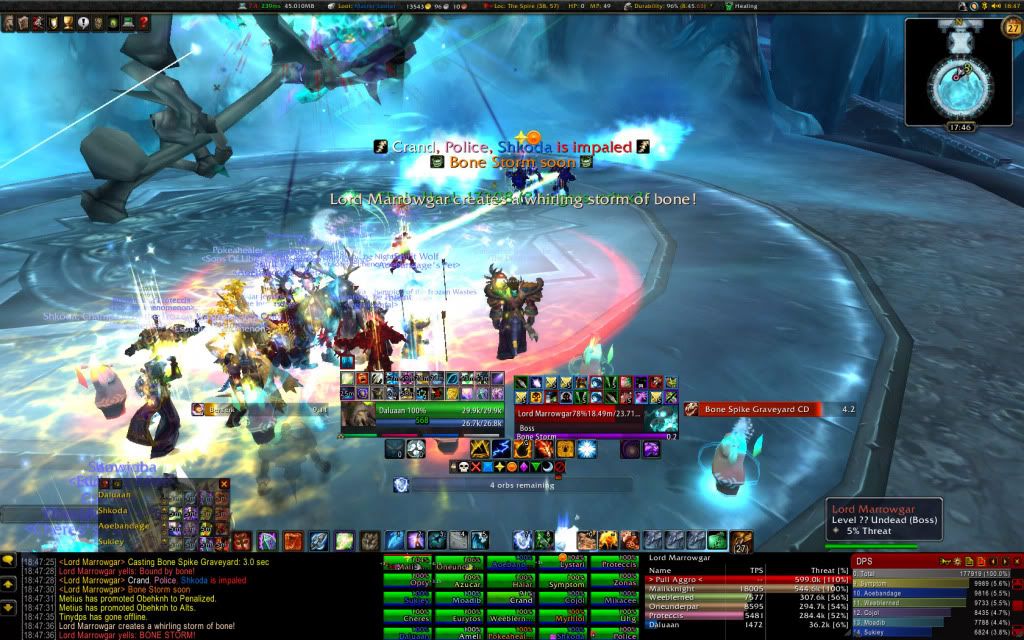
It's mostly the same, but there's a few key differences.
The most obvious one is that I've replaced my ActionBar area with my Raid Frames. This is because a vast majority of a Shaman's abilities are his totems, which are handled in their own little UI component. Therefore, unlike San, I found that Dal's action bars were mostly empty...especially when I removed all the heal buttons that are instead bound to different key+click combos in the raid frames.
VuhDo - I use VuhDo as my raid frame of choice. It's a little tricky to set up and there are some aspects of it that I like less than HealBot (which I used to use). But the big draw for VuhDo was that I could configure it to fit in that small space and still work well.
TotemCaddy - I prefer the default Blizz totem component over totem caddy for managing my totems, mostly because it fits better into my sleek design goal. It keeps all the buttons in a nice row, rather than in a boxy component I'd have to slide somewhere. However, I keep TotemCaddy installed for the buff bars. I use them to keep track of my shields, cooldown on Fire Nova, and (when in Enhancement spec) my MW stacks.
TotemGuru - This is the box to the left of my totems, above the chat pane. It shows me what totems all the Shamans in the raid have down and which ones I'm in range of. It's a great tool for helping me determine what I need to keep down without the tedious process usually needed for that.
I actually have TotemGuru in use on San, too, though I frequently forget to turn it on in a raid environment.


Totemguru is new to me... I must check it out!
ReplyDelete